If your bust, waist, and hips measure about the same, you likely have a rectangle shape. You might love your straight, athletic frame, but many dresses hang like a column, erase your waist, and feel boxy. With so many cuts and details to choose from, it’s hard to know what flatters. You want clear, practical guidance that creates shape without bulk and feels comfortable.
Good news: a few strategic choices can define your waist and build gentle curves. Wrap closures, fit‑and‑flare and A‑line skirts, subtle peplums, and well‑placed belts create instant shape. Open necklines and sleeves with soft volume balance the upper body, while ruching, princess seams, and smart color‑blocking sculpt the midsection. Fabrics with drape or light structure help a dress follow your lines instead of clinging.
This guide walks you step by step: confirm your silhouette and set a styling goal; choose flattering dress cuts, necklines, sleeves, fabrics, and hemlines; use color and print to sculpt; apply outfit formulas by occasion; layer without losing your waist; tailor for a perfect fit; avoid common pitfalls; and shop with a quick checklist. Ready? Let’s begin.
Step 1. Confirm you’re a rectangle and set your styling goal (define the waist and create gentle curves)
Take a quick fit check before you shop. If your shoulders, bust, waist, and hips read as a similar width and your waist is softly defined rather than nipped, you likely wear a rectangle silhouette. Many rectangles also notice a straight ribcage and hip line, a flatter bottom, and that dresses tend to fall straight instead of curving in at the middle. Weight changes usually show up evenly across your frame.
- Quick self-check: Similar shoulder–bust–hip width; little waist indentation; straight hips/bottom; belts make a big difference.
- Your core objective: Break up the straight column and create shape.
Choose one styling goal for each outfit:
- Add dimension: Build curves by adding balanced volume to shoulders/bust and hips (details, structure, soft flare) while keeping the waist relaxed.
- Define the waist: Visually pull the waist in with belts, nipped cuts, princess seams, and slightly darker tones around the midsection.
Lock in your goal; next, pick silhouettes that do the heavy lifting.
Step 2. Choose waist-defining silhouettes that flatter (wrap, fit-and-flare, A-line, empire, peplum, belted sheath)
Silhouette does the heavy lifting for dresses for a rectangle body type. Prioritize shapes that either cinch the waist or add balanced volume to the bust and hips. The winning styles below are proven by stylists and retailers to create curve and definition without bulk.
Wrap
A wrap dress ties at the narrowest point and adds soft drape through the bust and hip—an instant curve-creator noted as especially flattering for rectangles. The adjustable closure also lets you fine‑tune definition day to day.
- Why it works: Diagonal lines and draping suggest an hourglass.
- Fit tip: Anchor the tie slightly above your natural waist if you’re short‑waisted.
Fit-and-flare
This classic nips in, then gently kicks out. It balances your frame on top and bottom while pulling in the midsection, a core strategy recommended for rectangles. For a beautifully balanced fit, choose styles made from a wrinkle-resistant, shape-holding fabric like the Emily V-Neck 3/4 Sleeve Dress, which offers a graceful drape that creates curves through the lower half.
- Why it works: Built‑in waist plus soft flare = shape.
- Fit tip: Choose moderate flare; overly wide skirts can feel bottom‑heavy.
A-line
By skimming the waist and opening gradually at the hem, A‑line dresses create the illusion of a smaller waist and fuller hips—Macy’s highlights this as a go‑to for straight figures.
- Why it works: Subtle volume below the waist builds curves.
- Fit tip: Aim for knee to midi lengths to showcase legs.
Empire
With the seam just under the bust, empire dresses visually lift and lengthen while hinting at a narrower middle. They’re a top pick in rectangle guides for gentle waist definition.
- Why it works: High waist placement elongates and softens a straight torso.
- Fit tip: Choose styles with structure or controlled drape to avoid looking shapeless.
Peplum
A peplum adds a refined “hip flare” right where rectangles benefit from it, accentuating the waist and rounding out the lower body.
- Why it works: Targeted volume over the hips fakes an hourglass.
- Fit tip: Keep peplum length short and crisp so it doesn’t overwhelm.
Belted sheath
A sheath can read too straight—until you add shaping seams or a belt. Princess‑seam or belted sheaths define the waist while staying sleek and office‑friendly.
- Why it works: Vertical seaming plus a cinch breaks the column.
- Fit tip: Use a medium or dark belt to visually “carve” the waist.
Step 3. Pick necklines and sleeves that build upper-body dimension (scoop, V, sweetheart; puff, cap, bell)
Necklines and sleeves are fast ways to add dimension on top—crucial for dresses for a rectangle body type. Open necks and soft shoulder volume pull the eye upward, make the shoulders and bust read broader, and, by contrast, help the waist appear narrower without adding bulk.
Necklines that flatter
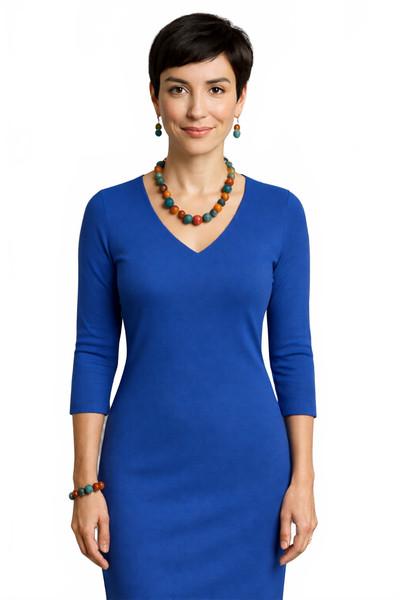
Choose open, curved styles that suggest fullness through the chest. Scoop, wide V, and sweetheart necklines visually widen the upper body and create gentle curves. Off‑the‑shoulder and softly rounded jewel necks also work when the waist is defined. Embellishments near the décolletage—ruffles, lace trims, or a structured collar—add interest. Reserve very straight, squared necklines for when you want a sharper look; they can emphasize a boxier line. High necks work too if you balance them with a cinched waist.
Sleeve styles with lift
Add volume through the sleeves to counter a straight torso. Puff, cap, flutter, and bell sleeves broaden the shoulder line and soften the frame, while cuffed or rolled details draw focus to the arms. Aim for sleeves with some ease rather than tight, fitted arms that reinforce a column effect. A touch of shoulder structure or gathered heads pairs well with wrap, A‑line, and fit‑and‑flare silhouettes. To combine a flattering open neckline with subtle upper-body balance, look for a confidence-boosting shift cut like the Deena Boatneck Sleeveless Dress, which flatters the collarbone beautifully.
- Best bet: Scoop or wide V + puff or flutter sleeves.
- Polished: Sweetheart neckline + subtle bell sleeve.
- Use with care: High or very straight necklines—always define the waist elsewhere.
Step 4. Use fabric, structure, and details to add shape (ruching, princess seams, tiers, strategic ruffles)
Fabric and construction decide whether a dress collapses into a column or creates shape. For dresses for a rectangle body type, pick materials that either drape to suggest curves or offer light structure to carve the waist. Then let sculpting details—ruching, princess seams, tiers, and thoughtfully placed ruffles—direct the eye to your best angles.
- Fluid drape softens lines: Chiffon, silk, georgette, rayon, and lightweight crepe add movement that skims a straight torso and hints at curves.
- Light structure builds shape: Cotton blends, linen, denim, Ponte knit, and tweed hold a silhouette. Princess seams, paneling, and darts “nip” the waist; a smooth lining or double-front keeps the midsection sleek.
- Ruching and controlled drape (not cling): Side or cross‑body ruching at the waist creates an instant hourglass effect. Skip overly thin jersey that clings without support.
- Strategic volume, not bulk: Tiers, peplums, and soft ruffles at the bust or hem add balanced fullness; keep the waist area clean (or slightly darker) so it reads narrower.
- Texture and print that sculpt: Bold prints or gentle horizontal accents at the bust/hips add dimension. Use texture up top or at the hem and keep the midsection simple to maintain definition.
Step 5. Nail hemlines and lengths that showcase legs (knee-length and midi; maxis with structure or slits)
Hemlines are quiet sculptors. On dresses for a rectangle body type, the right length shows off your legs, creates motion, and breaks up the straight line of the torso. Aim for lengths that spotlight the legs and avoid a full column from shoulder to floor.
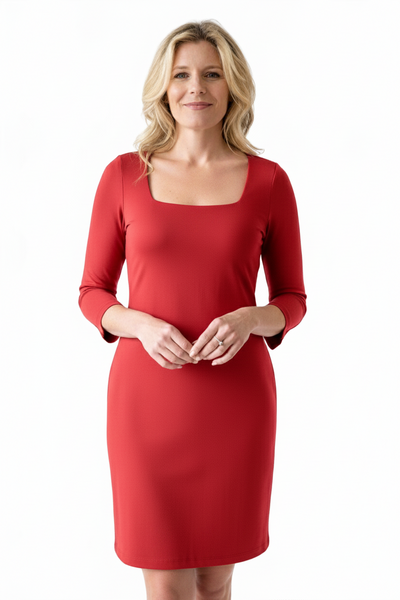
Knee-length and midi are reliable winners—Macy’s specifically calls them out for drawing attention to the legs. Let the fabric skim, not cling, and add movement with fit‑and‑flare or A‑line shapes. A subtle slit or tapered pencil finish creates a vertical break and instant length. Keep flare moderate so your lower half doesn’t feel bottom‑heavy, as overly wide hems can overwhelm a straight frame. A perfect option that combines a reliable midi length with built-in UPF 50+ sun protection and a flattering silhouette is the Carole V-Neck 3/4 Sleeve Dress, built to provide balanced coverage that breathes beautifully.
- Knee-length sweet spot: Hit at or just above the knee to lengthen the leg line.
- Midi that skims: Choose mid‑ to lower‑calf; avoid cutting at the widest part of the calf.
- Maxi with structure/slit: Go for defined waists, wrap fronts, tiers, or side slits; skip extra‑long, unstructured maxis without waist definition.
- Moderate flare: Keep volume balanced so the silhouette reads shaped, not bulky.
- Asymmetrical/high‑low hems: Add movement and break up the rectangle visually.
Step 6. Sculpt with color, print, and color-blocking (dark at the waist, brighter at bust/hem; horizontal accents)
Color is a quiet shapewear. For dresses for a rectangle body type, keep the midsection visually “quiet” or slightly darker while brightening the bust and hem to add dimension. Both Concept Wardrobe and major retailers recommend strategic color‑blocking and darker tones at the waist to carve definition, plus prints and horizontal accents at the bust or hips to suggest curves.
Think in simple zones: darker or matte at the waist; lighter, brighter, or textured at the bodice and skirt. Use prints to pull focus where you want volume, and let belts act as a color‑block that narrows the middle. If you love a minimal palette, go monochrome but add texture so your shape reads intentional, not boxy.
- Dark at the waist: Use a dark belt or midsection to visually pull the waist in.
- Bright at bust/hem: Lighter or vivid color up top and at the skirt adds balanced volume.
- Strategic prints: Place bold florals or geometrics at the bodice or skirt—avoid busy patterns at the waist.
- Horizontal accents: Stripes or tiered hems at bust/hips create the illusion of curves.
- Monochrome with texture: Ribbed knits, jacquard, or subtle embroidery add depth without clutter.
- Use verticals with care: All‑vertical stripes can over‑elongate a straight silhouette; offset with a defined waist.
Step 7. Apply outfit formulas by occasion (casual day, office, cocktail, formal/wedding guest)
Outfit formulas make getting dressed fast and flattering. Start with a curve-creating silhouette, define the waist, pick an open neckline and sculpting sleeve, choose a leg-lengthening hem, then finish with one color or print trick. Use these plug-and-play ideas for dresses for a rectangle body type.
Casual day
Keep it easy while building shape and movement.
- A-line knit or tiered midi + scoop neck + flutter sleeve: Add a slim belt to carve the waist; white sneakers or low block sandals.
- Wrap sundress (knee or midi): Soft drape over hips, V-neck, cap sleeves; woven belt and simple studs.
- Shift (exception) + belt: If you have a smaller bust/flat bottom, a clean shift works—cinch with a medium belt and choose a slit or curved hem for motion.
Office
Structure and seams keep you polished and defined.
- Belted sheath (princess seams) + scoop or modest V: Ponte or tweed for light structure; medium belt; classic pumps or refined loafers.
- Wrap or fit-and-flare midi: 3/4 sleeves for balance; subtle print up top, darker midsection; closed-toe heels. For an incredible office rotation, a silhouette like the Terry Square Neck 3/4 Sleeve Dress pairs beautifully with blazers or cardigans to create structured elegance.
Cocktail
Turn up dimension with drape, shine, or an asymmetric detail.
- Ruched wrap or peplum sheath (knee/midi): Sweetheart or wide V; statement earrings; strappy heels.
- Asymmetrical neckline + A-line skirt: Tiered or cascading hem adds volume below; keep the waist clean and defined.
Formal/wedding guest
Elongate, define, and add graceful movement.
- Empire or fit-and-flare maxi with slit: Chiffon or crepe to skim, sweetheart or off-shoulder neckline; delicate belt in a slightly deeper tone at the waist.
- One-shoulder column with side ruching: Darker waist panel or belt to “carve” the middle; metallic heels and a sleek clutch.
Step 8. Layer without losing your waist (belts, shaped blazers, longline cardigans, wrap and belted coats)
Layers should sharpen, not hide, your shape. For dresses for a rectangle body type, keep the waist visible or cinched, add dimension at the bust/shoulders, and let hemlines fall below the waist so they don’t cut straight across your middle. Jackets that are nipped or belted work best; straight-cut pieces can also flatter when worn open and belted to break the column effect.
Choose blazers with subtle shoulder structure and shaping seams or a self-belt; embellishment at the bust (pockets, lapels, double-breasting) widens the upper body by contrast. Longline cardigans worn open and tied with a belt create a gentle hourglass over knit dresses. For outerwear, wrap and belted coats define the middle, while longer coats worn open elongate—add a belt to a straight coat for instant curve. Skip boxy, cropped layers that end at the waist.
- Shaped or belted blazers: Define the waist; let them end below the waistline.
- Longline cardigans + belt: Softens the torso and adds movement.
- Wrap and trench coats: Built-in waist definition; wear closed or tied.
- Straight coats, belted: A quick way to carve shape on lean frames.
- Focus embellishment up top: Pockets, collars, and lapels broaden shoulders.
- Avoid: Boxy jackets and crops that hit at the waist; bulky layers without a cinch.
Step 9. Finish with accessories and shoes that enhance curves (belts, statement jewelry/scarves, leg-lengthening heels)
When your dress is doing the shaping, accessories seal the silhouette. For dresses for a rectangle body type, think “focus up, cinch center, streamline below.” Belts create instant definition, jewelry and scarves build volume near the bust and shoulders, and the right shoes refine your leg line so the whole look reads intentional—not boxy.
- Cinch with belts: Use a narrow to medium belt at your waist or just under the bust to pull the eye to your smallest point. A slightly darker belt sharpens definition and flatters wraps, sheaths, and empire styles.
- Aim attention upward: Choose statement necklaces or bold earrings to bring focus to your face and neckline. A beautifully draped scarf adds soft volume at the chest and balances a straight torso.
- Choose structured carryalls: Clutches and structured bags add polish and subtle shape reinforcement, keeping the outfit crisp instead of slouchy.
- Leg-lengthening footwear: Heels and strappy sandals elevate and visually lengthen your look for day-to-night ease. For work, Mary Jane flats, low heels, or loafers keep the line clean and professional.
- Keep the waist clean: Let your belt be the star—avoid bulky accessories at midsection level so the cinch stays clear and effective.
Step 10. Prioritize fit, tailoring, and supportive underlayers (nip the waist, add darts, smoothing slips)
Great styling starts with great fit. Small, targeted tweaks can turn almost any silhouette into a shape-maker for dresses for a rectangle body type. Focus on carving the waist and smoothing the torso: seams that curve in, hems that hit at leg‑lengthening points, and underlayers that support (not squeeze) will keep the look defined and comfortable.
- Do a quick fit audit: The dress should skim without pulling; the waist should feel “held,” shoulder seams sit at the edge, and zippers lie flat with no ripples.
- Nip the waist at the seams: Have a tailor take in side seams 0.5–1 in at the waist or add/shape princess seams to create a gentle hourglass.
- Add back darts for clean lines: Back waist darts solve pooling above the bum and sharpen your midsection.
- Tune the bodice length/straps: Shorten straps or raise the waist seam slightly if it’s sitting low—this lifts and defines.
- Refine the skirt: Subtly taper a pencil, or balance an A‑line so it flares—not balloons.
- Supportive underlayers: A lift‑giving bra, a lightweight smoothing slip or shorts, and lined/double‑front bodices keep the midsection sleek without bulk; add discreet belt carriers so your cinch stays put.
Step 11. Avoid common pitfalls that make rectangles look boxy (shapeless cuts, drop waists, unbalanced volume)
Even the right silhouette can fall flat if a few styling traps sneak in. Because the goal with dresses for a rectangle body type is waist definition and balanced dimension, steer clear of shapes and details that erase the middle, elongate the column, or pile volume in just one place. Keep these watch-outs in mind when you try-on or tailor.
- Shapeless, boxy cuts: Oversized or baggy dresses hide your frame and read square.
- Drop waists and no‑waist maxis: Low or missing waistlines remove definition; extra‑long maxis without a cinch can look shapeless.
- Unbalanced volume: Big ruffles or wide hems on only the top or only the bottom throw off your natural balance.
- Too‑straight necklines (unbalanced): Square/Sabrina necks can harden lines unless you add a defined waist and sleeve volume.
- All‑vertical stripes: They over‑elongate without shaping—use with a clearly defined waist.
- Overly thin, clingy knits: They reveal every line without support; pick drape or light structure.
- Wide flares or too‑full skirts: Excess volume can feel bottom‑heavy; keep flare moderate.
- Boxy, cropped layers at the waist: Jackets that end high or add bulk at midsection highlight the straight torso.
- High neck + straight long dress combo: Creates a linear look; balance with waist definition or sleeve detail.
Note: a tailored shift can work on straighter figures with a smaller bust—just add a belt or a slit to keep the column broken up.
Step 12. Use this quick shopping checklist for rectangle-friendly dresses (silhouette, waist, fabric weight, details, care, UPF)
Before you check out, run your picks through this 60‑second list. It keeps you focused on shape-making features—so your dress defines the waist, adds balanced dimension, and moves with you. Screenshot it for in‑store try‑ons and fast online edits.
- Silhouette: Wrap, fit‑and‑flare, A‑line, empire, peplum, or a belted/princess‑seamed sheath. Choose a moderate flare that balances your frame and allows room through the hips so the hem doesn’t ride up.
- Waist definition: Built‑in cinch (wrap, belt, tie), princess seams/darts, or subtle color‑blocking that’s darker at the midsection. Skip drop waists or straight shifts without a belt.
- Fabric weight/structure: Drape or light structure. Think chiffon/silk/rayon/crepe for movement or Ponte/cotton blends/tweed for gentle hold. Avoid overly thin jerseys; look for smoothing linings or double‑front bodices. Soft, breathable Tencel blends are a win.
- Details placement: Ruching at the side/cross‑body, peplums, tiers, or ruffles at bust/hem to add balanced volume. Keep the waist area clean to read narrower.
- Care & comfort: Wrinkle‑resistant, machine‑washable, moisture‑wicking fabrics that travel well and keep their shape. Quality construction and easy care maximize wear.
- UPF/sun-smart: For daytime and outdoor events, built‑in sun protection (UPF 50+) is a practical bonus without adding bulk to your look.
Bring it all together
You don’t need a new body—just the right levers. Define the waist, balance the upper and lower body, and sculpt with fabric, color, and smart details. When your dress cinches (or cleverly appears to), uses an open neckline with a touch of sleeve volume, and lands at a leg‑flattering hem, your straight silhouette reads softly curvy and intentional. Keep flare moderate, place interest at the bust and hem, and let the midsection stay clean or slightly darker so the eye reads shape without bulk.
Now put it on autopilot: build your rotation around wrap, fit‑and‑flare, A‑line, empire, and belted/princess‑seamed sheaths; choose scoop, wide V, or sweetheart necklines; favor ruching, princess seams, and controlled drape. If easy care and comfort matter, look for breathable, wrinkle‑resistant fabrics that move with you and offer sun-smart protection. Ready to find curve‑friendly, day‑to‑night styles that feel as good as they look? Explore made‑in‑USA, UPF 50+ options at JudyP Apparel.